We recently updated a customer’s On-Premise infrastructure. He now has new Servers and Storage for his VMware ESXi 7.0 environment.
After moving all virtual machines to the new hardware (we used Veeam for this part of the migration), we also wanted to move one VM from Azure to the On-Premise infrastructure. This particular VM used to cause problems on the old infrastructure, and because of that, we moved it to Azure. We made this migration to Azure also with Veeam. But Veeam didn’t have an option to move the VM back from Azure to the new VMware environment.
So after some searching, I found a free tool that could migrate the VM back to VMware. The tool is called StarWind V2V Converter. It can also convert different virtual disk formats. The VM has to be powered off, which means the migration back would cause some downtime. But the VM was not critical, so that shouldn’t be a problem.
So here is a step-by-step guide on how to migrate a VM from Azure to VMware ESXi 7.0.
Prepare Azure
The following steps prepare Azure for the access of the StarWind V2V Converter application. We register an application to access our Azure instance and give it the appropriate rights to migrate the VM. We also need to increase the time a token is valid in Azure because of the time it takes to migrate the data.
- Log in to the Azure Portal
- Go to the Virtual Machine section in Azure and power off the virtual machine you want to migrate.
- Go to the Azure Active Directory
- On the left navigation pane, select “App registration”
- Click “New Registration”
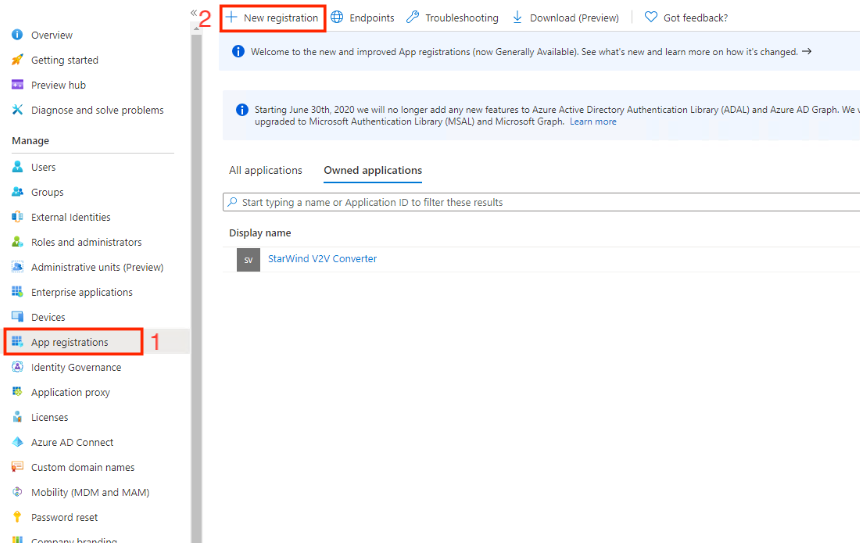
- Give the App a name, I named mine “StarWind V2V Converter” and hit “register”
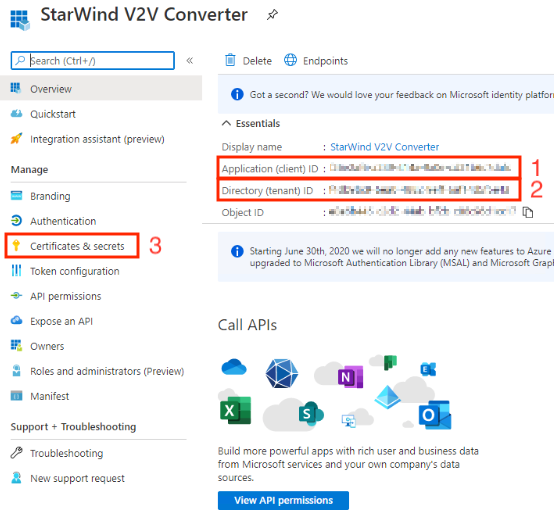
- Copy the “Application (client) ID” and the “Directory (tenant) ID”, you will need them later
- On the left navigation pane, select “Certificates & secrets”
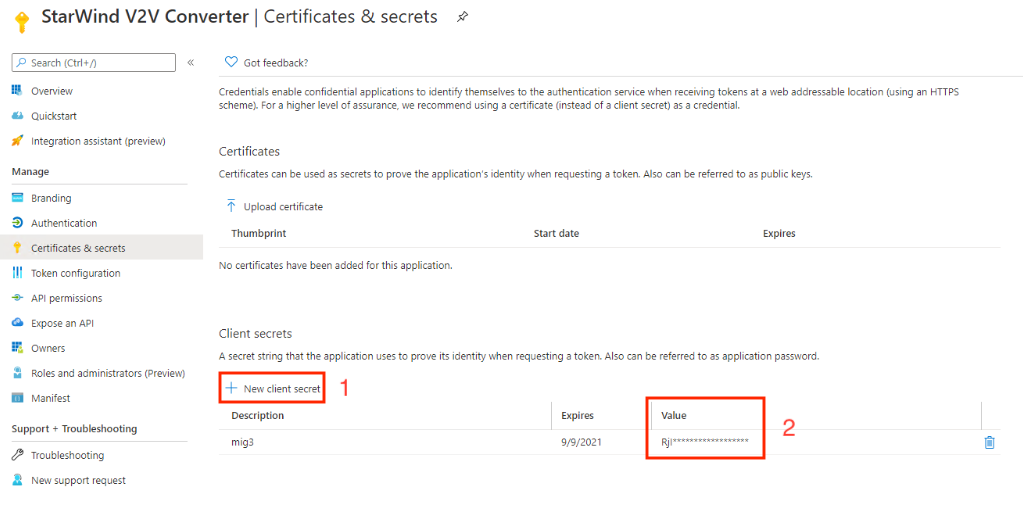
- Add a new client secret, copy the client secret, you will need it later
- Now go to the subscription section
- Select the subscription that contains the VM you want to migrate
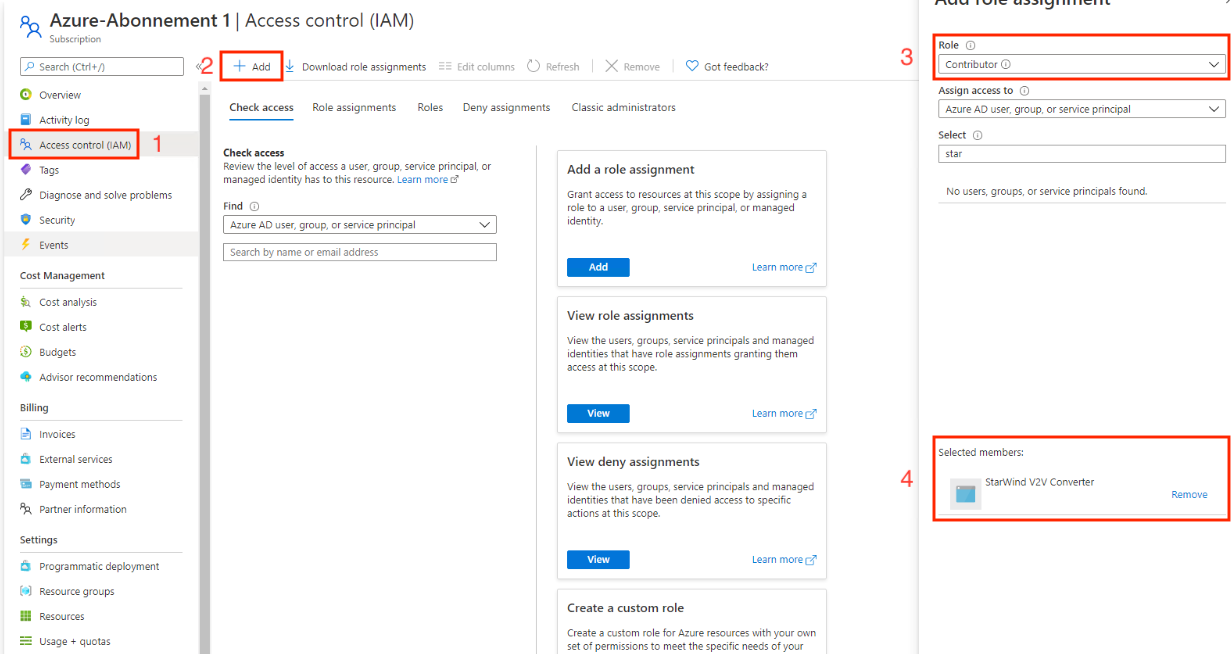
- On the navigation menu on the left select “Access control (IAM)”
- Add a role assignment, as Role select “Contributor” and from the list below, select your previously created application and click save. In my case, I searched the name “StarWind V2V Converter”.
- After this, we have to increase the time an authentication token is valid in Azure. Otherwise, the migration will fail because the token expires if the migration takes longer then an hour. To do that, we use Powershell and enter the following commands:
With this command, we connect to the Azure. You will get asked the login credentials for your Azure account.
# Connect-AzureAD -Confirm
And now, we increase the access token lifetime to 3 hours with this command.
# New-AzureADPolicy -Definition @('{"TokenLifetimePolicy":{"Version":1, "AccessTokenLifetime":"03:00:00"}}') -DisplayName "OrganizationDefaultPolicyScenario" -IsOrganizationDefault $true -Type "TokenLifetimePolicy"
If you want more information about Azure tokens and their lifetime settings read the Microsoft docs.
Local Computer
The local computer is the staging area for the migration. Make sure that the computer has access to the Azure Cloud and the ESXi Server.
- Install the StarWind V2V Converter
- Start the newly installed software and on the first screen, select Azure and click next
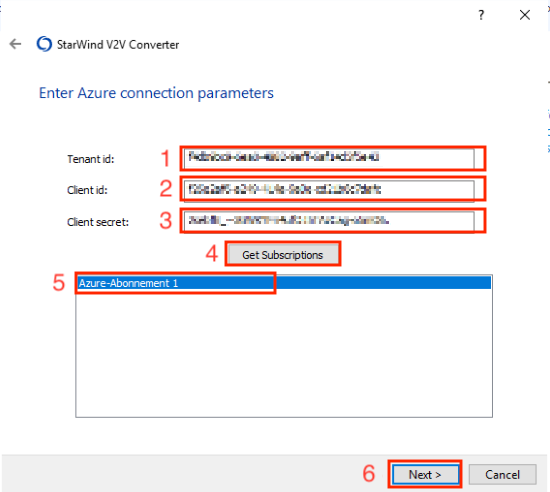
- Now you need to fill in the IDs and secrets you created before on Azure. For the Tenant ID, insert the value from “Directory (tenant) ID”. For the client ID, insert the value from “Application (client) ID”. For the Client secret, insert the secret you created before.
- After inserting the information, click “Get subscription”, now your Azure subscription should show up in the list below
- Select your Azure subscription and click next
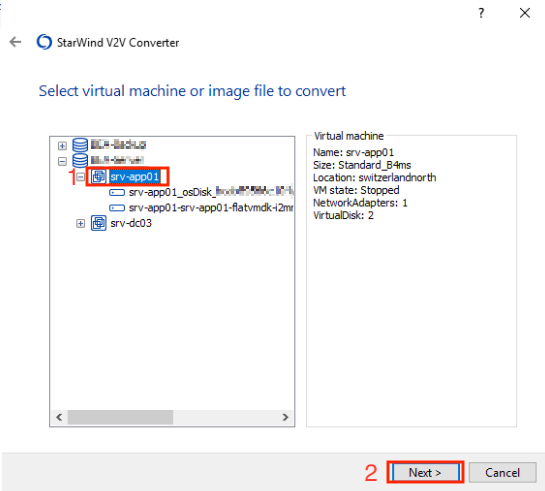
- Now you can select the VM you want to migrate. After choosing the VM, click next
- Now you can choose the destination of the migration, in this case, chose “Remote VMware ESXi Server” and click next
- Enter the IP and the login credentials for the ESXi server you selected as a destination and click next
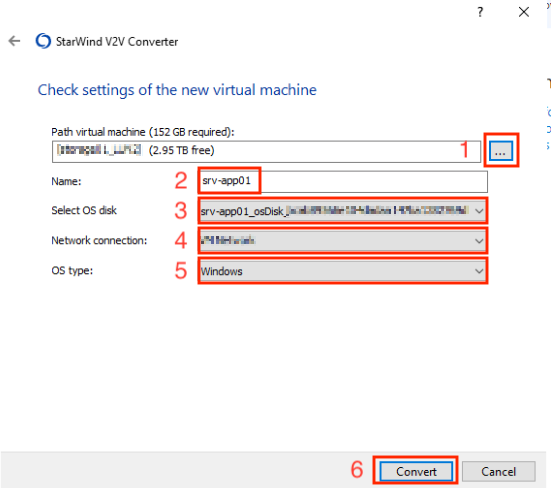
- Now you can input a data store for the virtual machine on the ESXi server, select a name for the VM and configure the OS type and network. You also have to select the VM’s OS Disk. In Azure, the OS Disk usually contains the string “osDisk” in its name. After this, you hit the “Convert” button, and the VM starts migrating. The conversion may take some time, depending on the size of the VM.
- After the conversion is finished, you can log on to vSphere and power on the VM. When I did this the first time, the mouse pointer didn’t work correctly and was jumping around. If you encounter the same problem, you may have to do some extra steps explained in the steps 11-15
Optional steps
- Power off the migrated VM
- Create a new VM and make sure to select the correct OS when asked. Don’t create a new disk for this VM
- After creating the VM attach the disks of the migrated VM
- Set the boot option for the new VM to BIOS
- Power on the new VM. Now everything should work as expected.
After the migration finishes, you can delete the app registration we created when we prepared Azure.